Showing posts with label Recipe. Show all posts

Wednesday, June 15, 2011

Skillet Bread

Italian Skillet Bread...

We normally just call this "Skillet Bread", but since this is Jenny's  Alphabe-Thursday's "I"  and since I typically make this with "Italian-inspired" entrees like Chicken Parmesan and Spaghetti...I thought "Italian Skillet Bread" was perfect.

And I had to go over to Jo's awesome Giveaway...

...which brought me to Happier Than a Pig in Mud...so I'm linking on to her fun food BlogHop this week!

And also joining in with Alicia for Friday Photo Flashback
...and with Mel for Fancy Friday.
...and with Dolly & Lorrie's co-hosting their Recipe Swap Meet
...and with Bibi for Foodie Wednesday.
...and with April for  Military Monday blog hop.

***
First, a little bit about this yummy bread...

Amongst some of our kids' favorite requests when they come to visit, this little tasty tidbit makes its way with a meal...cuz its so quick and easy!  

...um...did I say "So Easy!"...This yummy addition to any meal is "Super-duper Easy!"

I do make it with the Chicken Parmesan, Eggplant Parmesan, Spaghetti...but also have made it to go with soup or chili...   I don't do measurements with this, but for this post, I tried to keep some of it in mind as well as the time and temp...

So here we go...

~ITALIAN SKILLET BREAD~

1. Ingredients are:  1 can of the biscuits, garlic powder, parmesan cheese, butter
(A non-stick skillet and lid).


2. Melt 1 tablespoon butter in skillet on low to medium.
Add a thin layer of garlic powder and parmesan cheese to the bottom of the skillet.
Pop the biscuits open (This still is such fun to do!)


3. Add the biscuits on top of the butter, garlic powder and parmesan cheese..in one layer...looks like a flower :o) Add about one more tablespoon of butter...I just put some pats of butter right on the biscuits.
And sprinkle more garlic powder and parmesan cheese to your taste.

Cover and let the one side brown on the medium heat for about 4 to 5 minutes or til golden brown.


 4. When one side is brown, I just slide the biscuits onto the cover and then use the lid to flip the biscuits back into the skillet, so that the other side will be browned.


5. Keep covered and keep cooking on medium heat til brown. Check and see that biscuits are cooked through with no doughy consistency. (About 5 to 6 minutes).


6. Flip onto a plate and serve hot! Yumm! Hope I explained it clearly. Enjoy!


(***I'm glad that I was able to join in this week in the fun blog hops/memes! Actually surprised that I was able to get this post together!...hm...I made that skillet bread so that I could post pictures with this post... and with our kids living out of state and my hubby at work... there's nobody ("no buddies") to share it with...***)
***
Here is a photo of our daughter Girly~Twirly and her boyfriend when they came home on their Spring Break this year. I know that I made the Italian Skillet Bread when they were home...but I guess, I didn't take any photos of any of our meals together!


 & here is a photo of my Handsome Honey with our son Heartbreaker and his girlfriend, when they came to visit during Spring Break this year...
(I couldn't find any photos of us when we had the skillet bread....but you can see the Monkey Bread (aka Pluck Cake aka Pull Aparts) that I had made when they were home.


(I was going to share that monkey bread recipe...that I had been making since 1984, when a dear friend shared me her recipe! ...now you can find that yummy recipe right on the packages of the Pillsbury biscuits!)
...besides Sweet Jo already shared this on her post along with her delicious looking Cordon Bleu recipe.
....and I also couldn't figure out a way to incorporate the letter "I" with "monkey bread! :o)

 ***
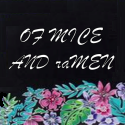
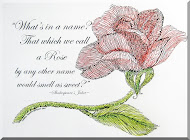
Have to get an order out today, so will close with only these art pieces that were recently done.
I realize that many of you are familiar with the art that I do....but for those that are new to my blog, every art piece that I do is drawn entirely with a person's name. Please take a look at more past orders on my facebook page...and I'd love if you become a "fan" of it by "liking" my facebook art page.

Thanks Angel, for ordering this one for your dad.


And thank you Pam for your interest in the art and it was fun doing this giveaway one for you to give to your hubby!


Thank you for stopping by...I will be sure to return your lovely visits! Thank you always for taking the time to comment :o)

(***added note: outside my front door, I found a fun surprise package left by the UPS man... my DVD of Hitch that I won on Quirky Pickings :o) Yay! Thanks sooo much! :o)

***
Oh! One more added thing: Our sweet daughter Girly~Twirly (aka theluckiestmrs) has posted after being MIA due to her work schedule! We talk with them every day, but it was fun to see that she was able to do a post today!
If you have some time, please stop by and say welcome back to this wonderful blog world...I'm so happy that she introduced me to blogging!

Signature for blog

Wednesday, February 9, 2011

R is for Review, Recipe, & Remembering...

I was so excited for the opportunity to Review a product for CSN

I am enjoying Jenny's Alphabe-Thursday meme
And this Review coincides so perfectly with the letter this week..."R".

First, let me share a few things about my experience with CSN...

---CSN has an amazing line up of products! (Whew! It was sooo hard to decide what to review!)

---I have purchased other items, since first hearing about CSN. (...and I am very pleased with what I have gotten so far.)

---One of the first items from CSN was through a wonderful giveaway that I had won. I had a little difficulty with the code (more likely, it was due to my computer-geniousness...um...more like my lack of...)   

...anyways...well...CSN's customer service was awesome! (I actually got to speak with a real-live human being...not a computer prompt!) ...and my problem was quickly resolved.

---and fast, fast, fast! Did I say fast? Each item came incredibly fast!

...so, here (on a bright and sunny day...yay, for a sunny day) is what was delivered at my front door...

I ordered it on Sat-Jan 22nd.
...it was shipped out on Tues-Jan 25th.
...and I got it on Friday-Jan 28th!
(It took longer trying to decide what I wanted than it took to arrive. haha)

 It was like opening up an unexpected surprise! 

Can you guess what it is?

It didnt seem like it had lots of protective packaging...but it arrived safe and sound, in perfect condition.

Do you know what it is yet?
(Oh! If my Handsome Mister Safety man was home when I took these photos, you would not have seen the packaging to the far left - that was partly on my stove top!!! oops! :o) 

& another surprise: I lifted the bottom rack and found:
 ...it came with this recipe & instruction booklet and spices.

**********
My mom would send us jerky (along with lots of other home-made goodies), no matter where we were stationed in the military.

And for one of our anniversaries, my parents bought us a dehydrator. I used the same one for years and years...but this past Christmas break, I realized that the second batch of jerkey seemed to take longer.  I had made the jerkey for our daughter (Girly~Whirly) and son (Heartbreaker) to take back to college with them.
**********

I couldn't wait to try it out.
...so my hubby bought a rump roast that Friday.
& the next day, I marinated it for about 10 hours in the fridge.

I didnt use the packet of seasonings that came with the dehydrator, but used my mom's Jerky Recipe.
These are approximate measurements, cuz my mom was a wonderful "to-taste" kinda cook. 
(Oh, How I wish that she was still alive and I could give her a quick call about her recipes, and everything else!  ...and just to hear her sweet voice!)

My mom's Jerky marinade Recipe:
2.5 lbs of roast (sliced thinly)
1.5 cups shoyu (Hawaiian pidgen for soy sauce)
1 cup brown sugar
1 tsp (or more if you like it hotter) cayenne pepper
1 Tblsp garlic
1tsp (or 2tsp... an estimate) of liquid smoke.


There was a little bit of sound as it dehydrated... 
but overall, it was pretty quiet.

 Our old dehydrator was round, but I like the shape of this one, it seemed easier to lay the meat slices in the square shape.

The only "negative" thing about this dehydrator would be that it only came with 4 drying trays (you can order extras from Nesco).  The 4 trays were perfect for the 2.37 lbs of sliced meat that I had.

The size of the trays were quite large. (I love my kitchen, but in our next home I would love to have a large farmhouse style sink, so that I could put large pieces in to soak). 

(You can also see the "fruit roll" sheet that comes with this dehydrator for making fruit rolls. I placed it on the the very bottom to catch any drips so that clean up was easier.)

And here it is-fits perfectly on the bottom shelf :o)

 I divided the jerky for our 3 kiddoes and my hubby shipped them off with a few of their things for Valentine's :o)
 Happy Valentine's Day! 
...looking forward to our 29th Anniversary this Saturday!
Maybe a dessert stop to the Melting Pot in Savannah!!!
(*hint, hint*)

Although my sweetie is highly trustworthy regarding military affairs, things like...top security clearance, etc... when it comes to surprises like gifts, he can't help but give little hints about something...

So, last night: 
Mr. Hawaiian Hunk(my hubby of almost 29 years! :o) : "So, what's the name of that place you keep mentioning?"

Me: "...oh...what place... (yeah right, I have talked about this for some time, off and on...)...the Melting Pot?"

Mr. Hawaiian Hunk: "Yeah, what time is that place open?"

Me: "...OH! I can find out! (in my head, I'm thinking..."Yes!")

Mr. Hawaiian Hunk: "...well...I was going to surprise you, but since you got it out of me..."

Me: "hahahaha! what? You brought it up!" (He cracks me up! I love him and his "surprises"!)

**********
(As you may have noticed, I manage to get one post up a week, so some of my posts share a little more than I initially intended).
**********

Here's a few flashback memories and photos to add, 
as I join in with Alicia's fun Friday Photo Flashback.

When we were stationed in Hawaii. We had 6 year old Girly~Twirly, 3 year old Girly~Whirly and I was pregnant 6 months pregnant with our son Heartbreaker. Pretty much, especially in the first and second trimester of my pregnancy, I could only manage to eat and keep down- Taco Bell bean burritos. Our 8th anniversary dinner was with our little girls at Taco Bell :o)

(I tried to find a photo of that, but it must be with the Rubbermaids of photos waiting to be put into albums!)

so...here is one with all of us and my hubby's parents at the Honolulu airport, when they were going to fly out to visit his mom's dad in California. I guess the girls wore their Mickey Mouse hats to get them ready for Disneyland :o) 
I'm about 4.5 months pregnant...able to still wear regular clothes, since I really wasn't eating anything but those bean burritos.

At my in-law's home in Hilo, Hawaii...after the wonderful surprise baby shower they hosted. I'm about 8 months pregnant. 
Girly~Whirly, me, our nephew, Girly~Twirly, and my Hawaiian Hunk.

It was Easter the same time week that we were with his family. 
I definitely look like I am over my 1st and 2nd trimester of only eating bean burritos!
(Hm...maybe I can blame how huge I look on my tent style dress! haha)

Back at our military home in Schofield Barracks, Hawaii...

9 months pregnant...
This was the night before Heartbreaker was born.

With our Girly~Twirly and Girly~Whirly.


And thank you for stopping by and reading through this long post.  I will be by to return your visit.

**********
One LAST thing...I try to post past orders on every post.  

I've had lots of past "R" orders, like a Racoon, Rhinoceros, Radiology, Raiders, Radios(antique)... but thought this post was way too long already.

So here are two that begin with the letter "R".  
Thank you to these soldiers for their military service & their families for their support! & Thank you for the families who thought of these as gifts to their loved ones.


***
Oh... also...thank you for your kind comments regarding my last post about the Cathedral quilt I am working on. I had a few contact me regarding info on it and asked how I did mine. I have a very dear friend who is an excellent quilter, that showed me how she did hers 8 years ago. If I can do it, any one can do it. It is a matter of taking the time to do. I will share how she showed me in another post...
***

*Ok, this truly is the very LAST thing*
--- please do take a peek at my facebook art page and become a "fan" by hitting the like button. I humbly ask for you to help raise my fanbase...so that hopefully others will learn more about the art that I do with names. 

Signature for blog

Tuesday, July 21, 2009

Tastes of 2 momma's recipes...

For this week's blog hop...it's all about recipes...

Mr. B's mom (Lorain) and my mom (Remie) were wonderful cooks! So, I thought I would pick one recipe from each. (It was hard, since we have quite a number to choose from, so I thought I would pick two quick & easy recipes).

Lorain (of Portuguese descent) was born and raised in Hawaii. And one of the things I remember when I first met her as her newlywed daughter-in-law was the amount of food they make for get-togethers! Since they were not able to be at our wedding in Wisconsin, when we went to Hawaii for our honeymoon, they gave Mr. B & I a Hawaiian style luau inviting family and friends. I have never seen such HUGE pots and baking pans! And it was complete with a huge pig that was roasted in a pit dug into the ground.


Lorain's Corn Meal Cake
1 block of butter
2 eggs, beaten
3 tblsp yellow corn meal
1 cup milk
1 cup sugar
2 cups Bisquick mix
1/2 tsp bking powder
1/2 tsp vanilla
~>cream butter & sugar~>add eggs & blend~>add corn meal, bisquick, bking powder, milk & blend well with rotary beater.
~>pour into buttered square pan and bake in preheated oven (350 degrees) for 30 miinutes.
~>Spread top with 1/2 block butter while cake is hot. Serve warm.


Remie was born in the Philippines and married my dad, who was in the Air Force. About every two years, we moved and she made every place we lived ~ Home :o) She amazed me in that no matter what, when, where or who...she always had a delicious meal ready. Everyone was welcome. She did love to try new recipes. But often she would "create" to taste.


Remie's Panfried Beef & Onions

beef roast (thinly sliced)
1/2 cup flour
1 Tblsp garlic powder
1/4 stick butter
1 sweet vidalia onion (thinly sliced)
1 lemon
1/4 cup soy sauce

~>coat thinly sliced beef roast in the flour & garlic powder mixture (you can do this in a gallon zip lock bag)
~>pan fry breaded beef in melted butter (may need to add more butter-I'm estimating amount)
~>add onion slices and continue pan-frying until meat is cooked through and brown.
~>squeeze lemon all over beef and onion
~>add 1/4 cup soy sauce to pan
*serve over hot rice*

MckLinky Blog Hop
Related Posts with Thumbnails